Friday, June 19, 2009

Bureaucracy isn't helping ...

We recently received a letter from the Victorian Electoral Commission who wanted to know who was enrolled to vote at our house. We weren't on the list while the previous owner still was. That's OK, I thought…according to the instructions we just cross off her name and put our names down … but for some reason (and I don't usually do this…I think I was just waiting for something to defrost) I continued to read the fine print.

So the full paragraph actually reads:

If there are people listed who are no longer living permanently at this address, please cross their names out and write in their new address if you know it. Note: This information will only be used by the VEC to invite the person to update their enrolment. If you cannot provide a new address, we must send two letters to this address to inform them that they are being removed from the roll.

So the electoral commission is going to mail not one, but two letters to the address of someone who actually doesn't live there anymore. Is there something wrong with this picture, am I missing something fundamental?

Since enrolling to vote is compulsory here in Australia, how many wasted letters are mailed out every day? In these days when governments at all levels are trying to jump on the sustainable bandwagon (with more or less success) surely there is a more sustainable way to deal with this issue. At the very least, if a letter really needs to be sent, surely one would be sufficient?

Can anyone help me understand what I'm missing?

On another, not entirely unrelated note, I recently discovered that one of my favourite authors, the late great Douglas Adams actually wrote the script for a computer game that was released in 1987:


As the main character, you must deal with a long and complicated series of bureaucratic hurdles resulting from a recent change of address. Your mail isn't being delivered, you can't access bank accounts and nothing is as it should be. The game includes a measure of simulated blood pressure which rises when "frustrating" events happen and lowers after a period of no annoying events. Once a certain blood pressure level is reached, and in typical Douglas Adam's fashion, the player suffers an aneurysm and the game ends.

Douglas Adams was known for his comic science fiction writing ... sometimes though he could strike very close to the truth!

Tuesday, June 16, 2009

A helping hand with chocolate cake

We have a new addition to the family…


It's a Kitchen Aid…an incredibly overpriced but very sexy mixer. We have always walked through kitchen stores admiring them from afar (they are always placed on the top shelves) and mildly arguing about what colour we would choose if we ever won the lottery and could afford one.


But now a bright red mixer is sitting proudly on our bench. We don't technically own it … we are looking after it for a friend who has decided to move back to LA for a while but we will certainly be putting it to good use while it resides under our roof.

At first I was a little scared to use it…it just looks so good and I'm always ruining things much to Sim's eternal frustration…a little scratch here, a bit of food there that no matter how hard you try just can't be removed. But after a batch or two of dough for bagels, I'm starting to relax (and hopefully Sim is too!)

What I really like about it, is it's simplicity. It's solid and heavy and only has two levers. I hate it when you buy something and it feels plasticky and light and eminently…well…breakable…usually just as soon as the warranty has run out. This mixer feels like it will be around for a while. Which is lucky as Sim went and bought the pasta making attachments for it! We haven't had a chance to try them out yet, but look out for that post…we'll probably be singing it from the rooftops.

Sim did make a delicious chocolate cake on the weekend with the help of our new friend and in typical fashion muddied around slightly with the recipe and pulled out an absolutely stunning rendition. It was warm and delicious and comforting and just so…indulgent. I had four pieces in a row and now I feel like I have to go running every night for a month…but hell it was worth it.

Old fashioned chocolate cake
Adapted from the Good Taste Collection - Chocolate by Anneka Manning

185 g butter at room temperature, cubed
155 g dark brown sugar
1 tsp vanilla essence
2 eggs at room temperature
200g self raising flour
35 g cocoa powder
125 ml milk
50g dark cooking chocolate

Icing
1 ½ tblspoons cocoa powder
1 tbs warm milk
75g butter room temperature, cubed
125g icing mixture
1/2 vanilla essence

Preheat oven to 180 degrees celcius. Brush a round cake pan with melted butter to grease and line the bottom with baking paper. 

Use electric beaters (aka Kitchen Aid) to beat butter, sugar, vanilla essence until mixture is pale and the sugar dissolves. Melt the chocolate and add at this stage.

Add eggs one at a time, beat well after each addition. Sift cocoa and flour and add half to the butter mixture, then half the milk. Fold together [ no Kichen Aid required :( ] until well combined. Repeat with remaining flour and milk.

Spoon mixture into cake tin and bake for 40-45 minutes or until a skewer inserted in the centre comes out clean. Set aside for 5 minutes and then turn onto a wire rack to cool completely.

To make the icing, combine the cocoa and milk (in the Kitchen Aid!) Add butter, icing sugar and vanilla essence and mix until the mixture is well combined. Spread the icing over the cake and try not to eat too much in one sitting.

Sunday, May 31, 2009

A warming winter curry

Last weekend it was our friend Gavin's birthday and we contributed a lamb and eggplant curry to the festivities. You can read about how it all turned out on Gav's blog: the Greening of  Gavin. But I thought I'd share the recipe because it's one of our favourites.

This recipe is actually a Better Homes and Garden's recipe from sometime last year (very possibly the same time last year) and it's the perfect winter meal when you've got some time to let the seeds and spices and meat and vegetables just simmer away for an hour or more. It's served with a tomato salsa and yoghurt and rice and it's warming and fragrant and delicious.

Curry Ingredients

Besan (chickpea flour)
300mls natural yoghurt
600mls water

Olive oil

4 small eggplants, cut lengthways and cubed, salted and rinsed

900g lean diced lamb

2 tsp cumin seeds
2 tsp fennel seeds
2 tsp fenugreek seeds
2 tblsp black mustard seeds

2 brown onions, sliced
5 garlic cloves, chopped
3 long, red chillies (or to taste)

2 tsp tumeric powder
1.5 tsp cumin powder
1.5 tsp chilli powder
3 tsp salt

8 cm piece ginger, grated

1 can chopped tomatoes
2 sprigs curry leaves

Method:

It might look like a long list of ingredients, but it's really not too complicated. You just need to get everything chopped and measured out before you start cooking.

Combine the water and chickpea flour and whisk lightly
Add yoghurt and whisk until smooth

Heat the olive oil in a heavy saucepan
Fry off the eggplant until brown
Place on absorbant paper and set aside


Add a bit more oil to the same saucepan
Fry up the seeds for about 1 and a half minutes

Add a bit more oil
Add the onions, garlic and chilli and cook for about 2minutes


Add the spices and salt and stir through for a minute
Add the ginger and stir through


I can smell the spices now...yum

Add the lamb, brown and cook covered for about 10 minutes. (You might need to turn the heat down a fraction)


Add the can tomatoes, yoghurt mixture, eggplant and curry leaves and then simmer for at least an hour.


Just needs to simmer for a while


Salsa Ingredients

1 tbsp brown sugar
juice of 2 limes
1 spanish onion, diced
4 fresh tomatoes, diced
1 tsp nigella seeds
1/2 tsp celery seeds
1/2 tsp chilli flakes
4 cm piece of ginger, grated or chopped

Easy  - mix all that stuff together and there's your salsa.


Serve the curry with some basmati rice, some extra yoghurt and the salsa.

A homemade version of Homous

We have recently discovered the art of sprouting...well I guess art is perhaps a small exaggeration when you consider that you pretty much soak some grain or legumes or beans overnight and let them drain for a few days and before you know it...there's your sprouts!

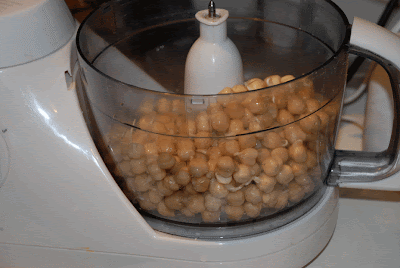
We've been sprouting chickpeas...and last night we turned our sprouted chickpeas into the most delicious, nutty homous you could imagine.

Here's what we started with...


I went to the local market, to one of those stalls that has bags and bags of all sorts of rice and grains and beans. The lady behind the counter was remarkably patient while I made up my mind, following me along the rows expectantly clutching a little bag just waiting to measure out what I wanted. I managed to resist the urge to buy a little bit of everything and came away with about 240g of chickpeas and 150g of mung beans (they are destined for the sprouting jar later today!)

You can buy sprouting kits but I think they're expensive when really all you need is a reasonably large jar and some mesh with a couple of elastic bands. The mesh bags you get oranges in work really well. We put about half the chickpeas into a jar and left them to soak overnight. You have to remember not to fill the jar too much with beans ... they expand to at least twice their original size. 


Sprouts are ready

Rinse them the next day and then turn the jar upside down at an angle so the water drains out throughout the day. A dish rack works well. Then all you do is rinse them every day for about two or three days and...voila...you have sprouted chickpeas. We left ours for three days and the sprouted bit was almost a centimetre long and I reckon we probably couldn't have let them go much longer. 


Getting the sprouts ready to blend

Out came the trusty food processer and in went our chickpeas, two or three tablespoons of tahini, a couple of garlic cloves, some lemon juice from about three lemons (with a bit of pulp thrown in too), a little bit of olive oil, a teaspoon of paprika and half a teaspoon of chilli powder (we love our chilli too). All of the ingredients are to taste really and we did plenty of that as we blended. If you don't like spicy things then you can leave out the paprika and chilli.


Hmmm...chilli

Blend until you get a smooth consistency, you may need to add a bit of water or olive oil to help out. What you end up with is a bit different from the stuff you buy in the shops. I think the sprouting makes the chickpeas really nutty with a tiny, tiny hint of sweetness. Ours tasted more...well...earthy...if that makes any sense. We just ate it with crackers...a lot of it with crackers. 


There is twice as much again in the fridge!


Thursday, May 7, 2009

I've got a shed...


It came with the house. It's about 6m x 3m and rests on an uneven concrete slab. It also came with some shelves (and the obligatory half empty paint cans). We have since added some ... er... other stuff...


We haven't yet unpacked all our boxes (I don't often turn on the light - that way I can't tell how much stuff I still have to sort out)...

Anyway the point of this post wasn't really to show off how much junk we can fit into a shed...but what I really want to do is set it up so that a) it's tidy and b) it's actually usable. I have visions of beer and wine bubbling away, shelves stacked with preserves and vegetables stored for use over the winter months.

But...there is so often a but isn't there...our shed has an inordinate number of red back spiders and who knows what other species of arachnids are out there hiding in wait in the dark corners. There are small gaps between the roof and the walls that while they don't really let in too much water, they do let in the cold (not to mention the above mentioned arachnids).

So today I'm asking for advice. I don't really want to get someone in to spray the spiders, but I would love a way to clear them out...I'm also wondering if it's possible to insulate the walls or, at the very least, cover the gaps with something to keep out the cold.

Do you have a shed? I'd love to see some ideas for sheds if anyone has links to any posts or blogs. One thing that continues to amaze me since I started reading blogs, is that when I start thinking about something, someone invariably writes about it...it's almost uncanny.

So all thoughts and suggestions welcome.


Wednesday, May 6, 2009

Sea Guardians and sustainable seafood

I have great memories of fishing with my grandfather up near Gosford, catching Bream and Whiting and Flathead on my little hand reel. I remember helping him scale and gut the fish and then we would BBQ them afterwards, wrapping the fish in foil.

I even went prawning with my uncle once. We headed out at midnight, and I'm sure we hauled in netfuls of prawns but I don't know if that is just my childhood memories playing tricks on me or if our catch was really that good. I do remember boiling them up and eating some of them as soon as we got home...I can still remember the taste, they were so fresh.

When I grew up, I became a scuba diver and now I see fish in a slightly different light. Don't get me wrong...I still eat fish; one of my favourite meals is fish and chips, with fish (usually flathead tails) we buy from the market and crumb at home and chips we make with potatoes roasted with rosemary and salt.

But now I also get to hang out with them and see what they get up to. I get to see sponges and corals that can be hundreds of years old. I get to see sharks that slice through the water in a manner so incredibly graceful and powerful. I get to swim with loggerhead turtles and hear the whales sing through the water. I get to see a whole complete world that is beautiful beyond comparison. 

I also get to see the degradation of the environment. I've seen the northern pacific sea stars that are interlopers that ended up here from the hull of boats passing through and eat their way through our native ocean environment. I've seen coral bleaching. I haven't seen a hammerhead shark or a blue whale and I hope to get the chance to before they're gone.


The Australian Marine Conservation Society was started in the 1960s to stop an application to mine coral on the Great Barrier Reef. Today they focus on getting more areas declared as Marine National Parks, they aim to make our fisheries sustainable and to protect and recover our threatened marine species. Another key focus is to educate and advocate against human induced climate change.

Overfishing, pollution and coastal developments are killing our oceans quietly. It is estimated that over three quarters of the world's oceans...yes that's the world's not just one...is over-exploited or fished to its limits. Scientists believe that 90% of the large predatory fish (such as sharks) are gone, wiped out. The cruelty of some fishing techniques is terrible, shark finning sees sharks caught alive, their dorsal fins sliced off before they are thrown overboard to drown or get eaten alive by other fish as they sink to the bottom unable to swim. Long-lines are literally long lines stretching for kilometres, their baited hooks indescriminately taking any fish that comes along...and let's not even start on the charade of whaling for 'scientific' purposes that the Japanese conduct on an annual basis.

There are small things we can do to help. I became a Sea Guardian through the Marine Conservation Society. I want to give them some money on a monthly basis to help them continue the work they do.

Even if you don't have any money to spare, you can help by not buying endangered fish or only buying fish that are caught or farmed sustainably. The Society publishes Australia's Sustainable Seafood Guide:


You can buy the extended version from the website for $9.95 and you also get...

...no not six steak knives ... but a small business size version. I keep mine in my wallet.


This version briefly highlights the three steps to sustainable seafood:

1. Avoid overfished species (the full list is contained in this pocket guide).
2. Make a better choice (some examples are included).
3. Ask questions from your fish monger.

For example, Orange Roughy is overfished and is a big 'no thankyou' and is also sold under the name of deep sea perch or sea perch. (Orange Roughy are thought to have a life span of about 150 years and they don't start breeding until they hit 30 years old!)

I have seen these guides around and about ... so if you ask around you'll probably be able to pick one up somewhere.

The oceans make up about 72% of the surface of our planet...it's amazing how easily they are overlooked. Without them, we can't survive and I think it's important that we make them an essential part of our sustainable lifestyle...


Tuesday, May 5, 2009

A garden update

It's been a frustrating few weeks in regards to the garden. We've been busy on the weekends and I've been sick for the last few days so outside has really been left to fend for itself!

The side we spent so long clearing over Easter is still exactly how we left it...


but Sim picked up a couple of bags of manure down on the Bellarine Peninsula last week so we plan to mix in some of that soon. It's a mix of cow, chicken and sheep and the farmer said it was quite potent so we're hoping the two bags will go a fair way. 

The small bed that we planted out with a seedling 'Winter Harvest' selection from Bunnings (just to get us started) is going strong ... you can even see a cauliflower forming


- and that's from the plant that the dog dug up. Something has just started eating the leaves so I'm going to head out one dusk and see if I can see any little critters having some dinner where they shouldn't be.

We've started planting a few seedlings ... we have made the mistake of not labelling them as we go though so in some cases it's a surprise as to what we're going to get. We do know this punnet has sugar snap peas, oakleaf lettuce and leeks:


This punnet is a bit of a mystery...pretty sure there is parsley and pak choy but as for what else...Sim can't quite remember!


We've tried to plant a couple of scarlet runner beans, although I think it might be too cold, and not much has happened yet. I'm enjoying the surprise of not knowing quite what we're going to end up with but I think when we start trying to plant more seriously, it's not quite going to work. 

We have since invested in some labels for future plantings.

Hopefully we can get back out there soon...


Tuesday, April 28, 2009

A decadant lunch

I love bread making … it doesn't really matter if it's in the machine or the oven or a combination of both; there is nothing like the satisfaction of getting the dough to rise and the smell of freshly baked bread….and I'm still only a beginner. I made bagels on the weekend (I've made a couple of batches before) but for the first time I began to understand how the dough should feel when you've kneaded it enough.

I don't know why, but I always though bagels would be difficult to make but they're actually not…a little bit fiddly maybe but not hard at all.

Ingredients:
6 cups of white flour
2 tablespoons of dry yeast
2.5 cups of warm water
2 tablespoons sugar
1.5 teaspoons salt
1 egg
Sesame seeds and/or poppy seeds

I usually mix the yeast and the water together for about 10 minutes to let the yeast activate…I have also read that this is an unnecessary step but I have found in my very limited experience that I get less failures if I do this step first.

While the yeast is activating, combine 5 cups of the flour, the salt and sugar in a bowl. Pour the yeast and water in and mix until a shaggy lump of dough forms. Put on a floured board and knead, adding the remaining cup of flour as required. When I first made these, the mistake I made was thinking that I had to add the whole cup…but I've since discovered that isn't always the case. What you want is dough that is smooth and elastic. (I actually only used half a cup of flour this time.)

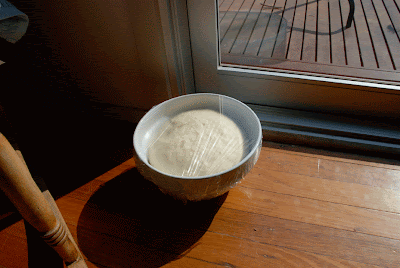
Put the dough in a lightly oiled bowl, cover and leave to rise until it's doubled in size (about an hour).


Remove the dough from the bowl and divide into 12 even pieces. Roll each piece into a ball, flatten slightly and put a hole in the middle. Cover and leave to rise for another 20 minutes.

And now comes the fiddly bit…get a pan of lighlty salted water to a rolling boil. You need to boil each bagel for about 2 minutes, turning every 30 seconds. I used a fry pan and could fit three to four bagels at a time. When you boil them, they puff up slightly and hold their shape better…but don't boil them for too long or they'll deflate and then they're no good.

Use a slotted spoon to remove them from the water, brush the tops with the beaten egg and sprinkle with poppy or sesame seeds. Put them in a 200 degree celcius oven for 25 – 30 minutes or until golden brown.


We have been having the most decadent lunches with smoked salmon, cream cheese and capers on the bagels, or breakfast with toasted bagels with cream cheese and vegemite (and this is another of Sim's combinations I highly recommend).

Wednesday, April 22, 2009

A cheap night out ...

Tonight we had a great night out for the grand total of $5.50 at the Melbourne Aquarium and we learnt something in the process.

Sim and I are mad keen scuba divers and have a particular interest in helping preserve our oceans and the animals and plants that inhabit that world.

We went to a seminar run by Reef Watch Victoria on an overview of Opisthobranchs of Southern Waters. Now, don't run away screaming at the scientific latin vocab ... it was actually a low key fascinating talk by an expert on marine slugs...okay that probably isn't really helping either is it...I can see everyone picturing those grey slugs from the garden that eat all the good stuff and foil every attempt to remove them.

This is what the talk was actually about:

That is what is commonly called a nudibranch and they come in the most amazing colours and shapes and sizes. Here are a few more:


Most of these photos I took in the Philippines but the one above in the middle is actually a local - Williamstown Beach right here in Melbourne.

The bits that look like feather boas are actually their gills. They're not very big...about the same size as land slugs if not a bit smaller but you have to admit they are much prettier; they are also referred to as the butterflies of the sea. The amazing thing is that not that much is known about them. It is estimated there are approximately 3000 different species worldwide but probably more. A lot have been identified but not formally described or named.

Bob Burns was the presenter and he has been studying these animals for more than 50 years. What is even more amazing is that he isn't a scientist or a marine biologist or even a scuba diver for that matter, he's a builder, a tradie so passionate about a particular subject that he has become, and is considered, an expert in his field. Scientists send him papers they've published for him to read...he even has one species named after him.

An added, and unexpected bonus, was the tour of the aquarium afterwards. We got to spend some time in the main oceanarium watching the sharks and the bull rays and the turtles and the snapper to name a few. It was a fascinating night...a glimpse into a world that is often forgotten and exploited but a necessary part of the system that maintains life on this planet.

Reef Watch is planning more seminars throughout the year...there may even be one about penguins (with a potential visit to the penguin exhibit at the Melbourne Aquarium). Check out the Reef Watch website if you're interested.

Pepper Pasta with capers and rocket

We are on the lookout for a cheap pasta making machine as we have fallen in love with the fresh pasta that I buy from the markets near my work. It’s a pepper fettucine and it's peppery and spicy and absolutely delicious. We use really simple sauces with this pasta because you don't want to hide the flavour of the pasta unlike the pasta that you buy from the supermarket.

Ingredients:
Capers
Zest from two lemons
Lemon juice (from one lemon - save juice from the other to taste)
Fresh basil
Rocket
Olive oil
Parmasan
500g Pepper pasta

The proportions of each are really as to your own taste; we are both massive fans of capers so we add heaps (I have even marked in my diary when caper bushes are available from Diggers this year: Wednesday 2 September – for all you caper lovers out there).

Add the pasta to a large pot of boiling water:


Heat a frypan and in some olive oil, gently heat the capers, adding the lemon zest and the basil:


When the pasta is almost done, add the rocket so that it wilts slightly. When the pasta is cooked to taste, drain but keep two tablespoons of the water and return it to the pot. Add half the pasta, then the sauce mixture to the pot, placing the remaining pasta on top, pour on the lemon juice and toss through. Have some parmasan ready and that's it:


This is our current favourite. I made a version of it once and Sim has since taken it on and made it her own…she is much better at putting flavours together then me…I'm a recipe follower and the slightest variation can throw me a curve ball but Sim just pulls meals out of nowhere and is really good at finding a substitute that works if we don't have the right ingredient.

One of the great things about this recipe is it is such an easy meal to cook when you need to whip something up quickly as it only takes as long as the pasta takes to cook (which takes about 8 – 10 minutes) and 500 grams of pasta will easily do us for lunches the next day as well. I know the process will become much, much longer when we attempt to make our own pasta but once we get our own caper bush and sow some rocket, we will be able to contribute most of the ingredients ourselves and we're really looking forward to that.

Tuesday, April 14, 2009

The Great Easter Garden Clean-up

Four days stretched out before us, four days of getting the garden sorted, de-cluttering the house, baking bread, cooking delicious homemade meals…before those four days suddenly flashed by in the wink of an eye and I'm once again facing my concrete wall at the office before I'm quite ready to.

I realise now that our list of tasks was somewhat ambitious…but we did actually achieve quite a bit:

One part of the garden went from this:

To this:

To this (all ready to get some no dig beds prepared):

We started a herb garden around our pond:

We built a gate (don't look too closely it might fall apart!)

And next weekend's job will be to hang it.

It was probably one of the first long weekends that we have spent the majority of it around the house or out getting things to use around the garden...and it was entirely enjoyable, I don't feel that we missed out on anything and besides, there's still plenty on the list to keep us occupied.

Wednesday, April 8, 2009

From rock cakes to fig and walnut loaf

We invested in a breadmaker a few weeks ago and before we bought it we had a conversation about our potential use of yet another appliance. We have recently moved into a pretty small house and it has made us think about what we put in it. I guess we've finally realised that all these handy appliances are only helpful tools if you actually use them.
And I'm pleased to report so far we have been baking up a storm.

I have to admit to a few false starts; rock cakes that didn't rise and would have easily broken any window without much effort...we even gave them to the dogs who tried valiently to eat them but in the end even they had to admit defeat:


My first success (read: edible) attempt was a Fig and Walnut Loaf I adapted from a recipe I found on taste.com.au. It was also the first one I found that used honey as a sweetener rather than refined sugar. I only used the breadmaker to knead and raise the dough and have been baking it in the oven. I'm guessing this probably isn't the most energy efficient way to bake bread and one day I plan to do it all myself but I'm not the most brilliant person in the kitchen so it's still all a bit daunting.

So here's the easiest loaf to make:

Ingredients:
1 sachet of dry yeast (7g)
1 cup warm water
45 ml honey (3 tblspoons)
440g of bread flour (I've been using white but I think wholemeal would be tasty too)
1 tspoon ground cinnamon
1 tspoon salt
150g of dried figs, coursely chopped
100g coursely chopped walnuts
Small amount of olive oil

Place the yeast, warm water and honey into the breadmaker and leave for 10 minutes so the yeast activates. Then add the flour, cinnamon and salt and set the breadmaker to the dough setting. I've been adding a small amount of olive oil for a bit of extra moisture at this stage too. Our breadmaker beeps just before the end of the kneading process to add the figs and walnut so they don't get too mashed up.

When the breadmaker has done its thing, take out the dough and knead it for a couple of minutes (I usually have to mix the figs and walnuts in properly, then put it in a lightly greased bread tin and leave it to rise slightly for 10-15 minutes. Put the dough in the oven at 200 degrees for 10 minutes to brown the crust, lower the temperature to 180 and bake for about another half an hour. When you tap it on the bottom it should sound hollow and then it's ready.

Now I take fruit toast to work instead of buying it...and make everyone jealous as they smell the cinnamon toasting in the lunchroom!


Monday, April 6, 2009

The garden bed is undone!!

We came home today to find our small vegetable garden that we planted out on Saturday dug through and the cauliflower and cabbage dug up. I'm here to tell you that bird netting does not work as a dog deterrent...especially one that is addicted to Dynamic Lifter. 

So I'm trying to maintain my positive attitude which was a little shaky anyway when I walked through the door with my train home LATE AGAIN after an eight hour day looking out the window of my corporate office onto a flat, gray wall of concrete. And it's not like the dog did it on purpose...

I guess we may have to move to plan B, and build a gate before we get too carried away with planting too much more stuff. We managed to work out how to join redgum sleepers together so perhaps a gate will not be too much of a technical leap...and I can slowly erase the painful memories of wood working class in year 7 when I tried to make a truck out of wood and it turned into an uneven crate with uneven wheels held on by match sticks...interesting the things we hang onto from our childhood.


I don't know if you can see from the picture above but we have ready made posts with a pergola exactly where we need the gate so anyone got any great gate designs for a span of about 2.5 metres and some unhandy people?!

Saturday, April 4, 2009

The first garden bed is done!!!

It's been a few months coming but finally we finished one garden bed today! It's a small step but a significant one in that it is a move in the right direction.

We have recently bought a house with a little bit of space out the back and we have been talking (a lot) about doing something constructive with it. We've been reading so many blogs .... the Greening of Gavin and Down to Earth are two that have particularly inspired us...and last weekend we actually stopped talking about it and made a start - sometimes the hardest part. 

We have decided on the no-dig vegetable garden so we headed off to Bunnings (while not the ideal choice we feel like such newbies we wanted to be able to ask advice if we needed to) for some redgum sleepers, some coach bolts to hold the beds together and a drill bit to get through the hardwood. Our original plan was to make two beds of 2.4m x 1.2m  as a beginning, but we discovered almost too late that 2.4m length sleepers were not going to fit in the car! Desperate to make a start we quickly rethought the plan and went for two beds of 1.2m x 1.2m. We do have space for more but we have to clear some room and we figure that we can use these first couple of beds as a bit of trial and error.

While I would like to boast that we put the framework together quickly and easily, the truth is that the first bed took us an hour and a half . We discovered that the Bunnings Man had advised us to get the wrong size drill bit and so we scrounged around at home and found the right size bit in a cheap set found in the shed - a lesson learnt that $11 on one drill bit is not necessarily the way to go nor is blindly taking advice from the Bunnings Man.


The second bed took us half an hour so I reckon we 'll get it down to twenty minutes easy - eventually. This is what we ended up with:


Today we filled one bed. We started with a layer of newspaper, then a 5 cm layer of sugar cane mulch. We added some concentrated dynamic lifter pellets and watered it in well. Next came a layer of cow manure, and then a layer of mushroom compost. We started the layering with the mulch again, dynamic lifter, cow manure and compost. Our sleepers are only 100m high so that was enough to almost fill them.


We want to grow our stuff from seeds eventually but we bought a kick-start pack from Bunnings of cabbage, broccoli and cauliflower. Finally we topped off our bed with a protective layer of bird netting...with two dogs who luurve rolling in dynamic lifter and birds that adore sifting through mulch for worms we figured this was the easiest way to get around both problems. 

Here's the final product. It may not look like much but we're pretty excited!